Applications & Uses
Hopefully it is clear just how flexible these system are. Because you can control all aspects of them, they are able to be adapted to meet almost any need. That said, they don't necessarily replace more 'commercial' sensors. The main reason is that there is a lot more work with these. They lack a GUI interface for downloading data, or for calibrating. And they are more prone to issues such as failure to record data or just not running. Because of this they tend to fit a slightly different role.
For researchers / anyone interested in monitoring a body of water these are an amazing way of expanding your area of monitoring. These can supplement your current sensors to allow you to see what is going on across a larger range. Being so inexpensive, you can make a ton of these and really cover a large area. They can also allow you to try and get data from places / events that would otherwise be too risky for more expensive sensors. Something like trying to record water chemistry data during a storm that might damage your expensive sensors. By using a cheaper DIY sensor system, you could get that hurricane data and not be as worried about the loss of expensive equipment.
These can also be used to kick-start a study or expand one already running. By being so cheap / simple, you can use these to collect preliminary data to build your grant, or maybe as a way to get some supplemental information on a project that has changed direction, or cannot afford something more expensive.
Lastly these can be a useful teaching tool and an amazing community scientist tool. Allowing someone to start to learn more about electronics, building / design, and about the environment around them. They are simple and if something goes wrong with them, there is not much resource loss.
Examples / Uses of DIY Sensors
Below are a couple of examples of DIY sensor systems I've built in the past. Each section also has a link to a GitHub page with the code that was used for that project. Hopefully this can give some ideas for what can be done. There are no Pro Mini versions presented here as I have yet to build one out and deploy fully for a project. But they operate the exact same as the Nano's.
Version Uno: CO2 and pH Sensors
This is a version using the Uno and Adafruit shield. For this application, we created a system that utilized an analog pH sensor along with a waterproofed atmospheric CO2 Sensor. This was deployed to get some understanding of carbon dynamics occurring in a stream in North Carolina. Both the pH and CO2 sensors are being powered from the Arduino. The CO2 sensor used here was from Sandbox electronics. They seemed to work well and stay fairly stable (not too much drift over time). The only thing to be aware of with the NDIR type gas sensors is that they are very 'power hungry'. The CO2 needed about 10 to 15 seconds of 'warm up' time before it was recording any sort of believable values. Because of this, there is a lot of power used just for the CO2 sensors, greatly reducing the length of battery deployment (about 8-9 days of use at 15 minute sampling intervals from 30 Ah of batteries). That said, the PTFE wrapped gas sensor worked quite well, and made for a great low-cost dissolved gas sensor.
See Code here.
If you are interested in building your own aquatic CO2 sensor, download this guide here. This will go through some more detail in how to build something like this. Specifically it walks through how to waterproof the CO2 sensor, and wire it into a DIY logger system.


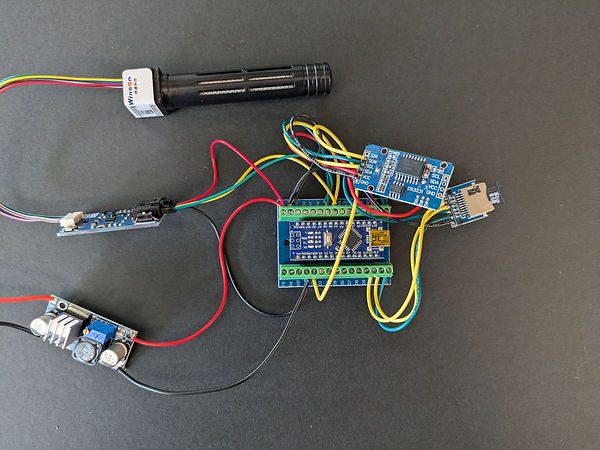
Sensors and electronics used. The case for this was just barely big enough to fit the batteries and electronics inside. This made for some tight sealing parameters. Something like the Nano Version would have helped with the space issues.
CO2 sensor wrapped in PTFE. Sensor was used to get measurements of dissolved CO2 in a freshwater stream.
Version Nano Co2:
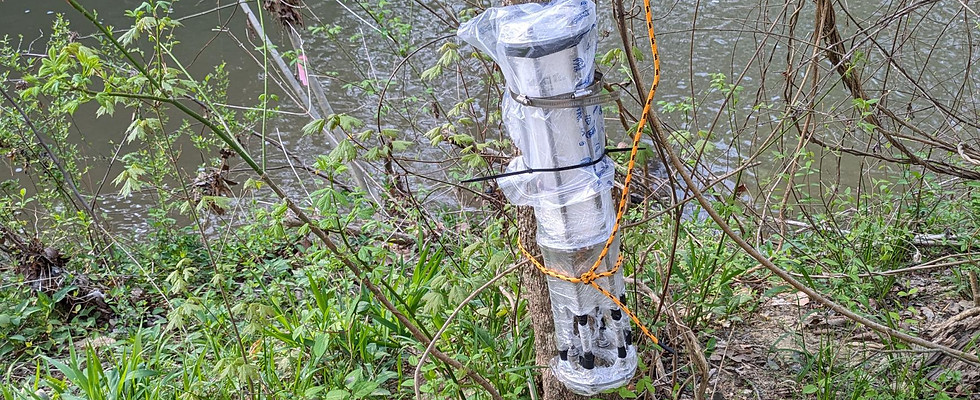
This is essentially the same as above, but now using the Nano as the microcontroller, and no longer having a pH sensor. This was built in order to measure changes in atmospheric CO2 in a forest throughout the day. Again the CO2 is quite power hungry, but this still worked out well. The Nano was able to draw a bit less power under sleep modes, and therefore these systems ended up lasting a bit longer (and no pH sensor helped extend the batteries as well). Specifically using the same 30 Ah batteries, these ended up lasting closer to 12 days at 15 minute sample intervals. That said, the CO2 sampling was still the most dominant power consumer. The smaller size of the electronics did make it much easier to fit into a PVC case.
See Code here.
Electronics outside of their case. For this project, the CO2 sensor was not wrapped in PTFE, since it would not be submerged. The picture at the top of this page is this sensor deployed out in the forest.
Version Nano Conductivity and Temperature:
This was created to test out how well we could build a cheap salinity sensor. Both the conductivity and temperature sensor have fairly low power needs, so this system can last a decent length of time on batteries. For this build, a 5.3 Ah battery was able to power the unit for 3+ weeks at a one minute sampling interval.
The conductivity sensor was tested to see how much it drifted over time, and over the course of about 2 months there was very little drift at all (+ or - 5 uS/cm). One note on these sensors is that the conductivity sensor is pretty exposed, and it would be a good idea to build some sort of protection around it, before deploying it.
These systems were tested in both a 'home made' PVC case and a modified waterproof box case. Both worked well, and stayed dry. The PVC shown below (1.5 in PVC pipe) was the smallest diameter that could fit all the electronics and batteries.
See Code here.

Two examples of a temperature / water conductivity sensor. Both use the same electronics and code, but are just packaged in different housings. For the PVC housing a 3D printed cage was added as a way to test different protection systems for the conductivity sensor.
Version Pro Mini: Turner Cyclops Logger
Utilizing the Arduino Pro Mini, a logger system was built to work with an analog version of the Turner Designs Cyclops optical sensor. This line of sensors are all optical based, and allow for in-situ measuring of various parameters depending on the wavelength of sensor you get. In this case, I was using some older models of their Cyclops-7 FDOM sensors that are specifically tuned to measure FDOM in the water. FDOM (Florescent Dissolved Organic Matter) is a proxy measurement of the dissolved carbon in a water body.
These sensors are somewhat expensive (~$2000+ each) so we wanted a cheaper logging system to allow for continuous deployment of them in a black water river system. To achieve this, I built out a Pro Mini data logger (following the wiring / setup from the Version Pro Mini section of this site). From there I modified an old 6 pin wet-mateable wire connection to act as a bulkhead connection. By modifying an underwater wire, I now have something to bridge between the Arduino and Turner sensor. The wiring for these are very simple, and documentation for them can be found on Turner's website. For this application it is wired as such:
Turner pow (+) -- pin 5
Turner signal (+) -- A1
Turner pow gnd (-), signal gnd (-), 10x gain -- Arduino ground
As you can see, the only thing unique here is that I have wired all the grounds together along with a 10x gain signal wire. This allows for the Turner to have a more accurate measurement of the FDOM concentration I expected to be found in the system. All the electronics are encased in a 2 in PVC case. The sensor itself is embedded in a removable rubber cap (sealed with silicone caulk), and then the other end of the PVC case is permanently sealed with a ridged PVC cap.
The electronics are being powered by two 7.4 v rechargeable batteries (Li-ion). I've also switched to using barrel connectors for my battery connections. I've found them to be more simple for everyone to use, and since they are screw terminals, it is easy to wire in more or less batteries to achieve your desired volts / amps.

Fully assembled logger. 3D printed cage on top is to protect the Turner sensor.

Closer view of the Arduino Pro Mini logger system. Everything is 'glued' together and onto some foam board to help keep the electronics better protected. Two 3 Ah batteries wired in parallel are providing power

Fully disassembled Turner logger system. The green / blue plastic to the right is a 3D printed cage that goes over the turner sensor sticking out from the PVC. This is to give some protection to the sensor from getting hit while deployed or while being transported.

